Rotator Cuff
As you may recall from our intro post on kinesiology taping, we’re going to focus on each muscle group/joint and show you how to use kinesiology tape in three distinct ways:
- Immediately after injury (for swelling and pain)
- During the healing process (correction techniques to restore normal position and allow for healing)
- Techniques to help improve strength + function
In this post, we’ re going to be talking about a taping application designed to inhibit the muscles of the shoulder to allow for rest and recovery. This is important in the case of a rotator cuff injury where the small tendons have become pinched and inflamed. When this happens muscle imbalances can occur and the shoulder blade can lose it’s normal alignment/mobility. As the body tries to compensate with the larger muscle groups (i.e. the deltoid), it can make this problem worse and lead to further injury.
Anatomy
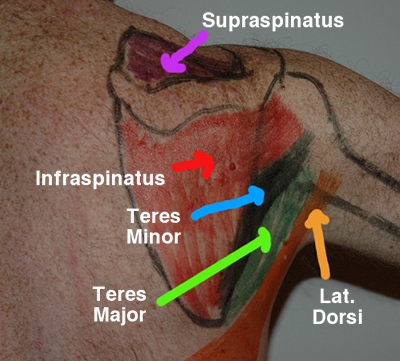
For this taping application, we want to look at the muscles of the shoulder. The rotator cuff consists of four separate muscles: the supraspinatus, infraspinatus, teres minor and on the inside of the shoulder blade the subscapularis. All four of these muscles start on the shoulder blade and then insert onto the humerus (upper arm bone). Think of it like a hand laying on the shoulder blade and then wrapping its fingers over the joint. This is why even though it hurts in the front of the shoulder around the tendons, the real problem is in the muscles that become those tendons on the back of the shoulder.
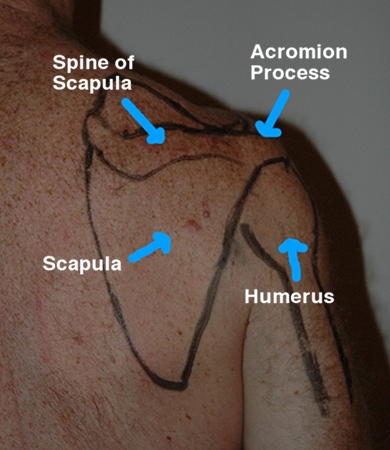
Specifically for this application you will need to be able to find the spine the scapula. Think of the shoulder blade like a bony triangle that sits on the back of the rib cage and is held in place by muscle. The most prominent feature of the shoulder blade is the large bony ridge that runs across it. This is known as the spine of the scapula. If you reach over your shoulder with your fingers, this bony ridge will be easy to feel.
You can read more about the anatomy in this area and find palpation tips here.
What you will need:
1) Roll of kinesiology tape.
2) Sharpest scissors in the house.
Prep work:
1) Clean skin. This means no oils or lotions of any kind. You want your skin to be clean and more importantly dry. Moisture of any kind = tape will fall off or fail to stick altogether.
2) Hair care. Ideally, the less hair the better. Guys, this means that for best results you will need to trim any long leg hair or shave the calf area.
3) If clean, dry, and hairless skin still = no sticking of tape. Time to get some adhesive spray like Tuf Skin.
4) The tape should last 3-5 days. You can get it wet and shower with it on. Just towel dry it after. No hair dryer! The tape is heat activated.
Taping Techniques
1) Rotator cuff application (two strips):
Key Points:
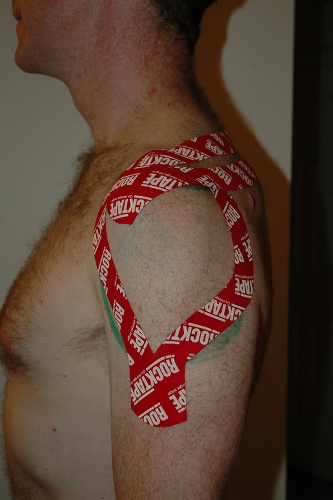
- Prep the skin first. For this application, there are two Y strips and each will require you to place the arm in different positions. For the first strip along the back of the deltoid, you will need to move the arm forward across the body like you are reaching to your opposite shoulder. You will then need to reposition the arm so that you are reaching behind your back (like you would to tuck in your shirt) to apply the second strip along the front of the deltoid. This arm position will remain the same as you apply the second Y-strip along the spine of the scapula. Confused?? All of this is in the video above.

- Strip #1- deltoid. Start by placing the anchor at the base of the deltoid muscle. The anchor should be 1-2 inches in length and then you will have the two strips to use. Place the arm in the stretch position and then lay the tape down with NO stretch. Reposition the arm as shown above and repeat for the second strip.
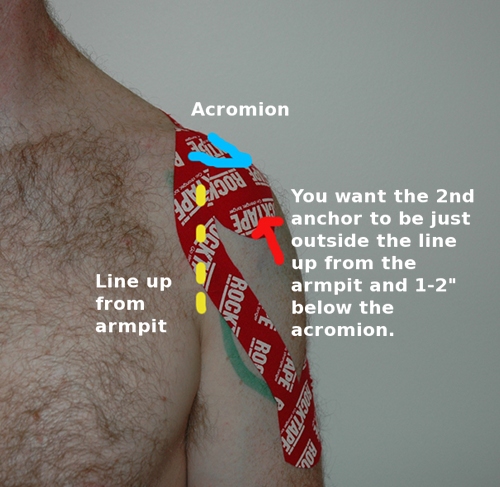
- Strip #2 - supraspinatus. Start by placing the anchor at the front of the shoulder. You want this to be 1-2 inches below the acromion process (use the palpation tips and link above!) and just to the outside of the line up from the axilla (armpit). For the anatomy guru’s you’re looking for the greater tubercle of the humerus.
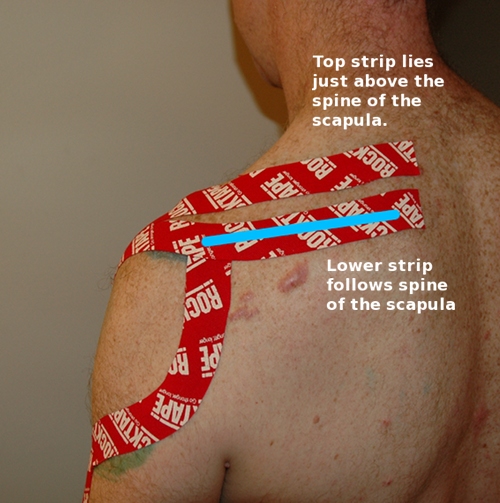
- Once the anchor is in position, move the arm so that the area is on stretch (reach behind the back like tucking in your shirt). The lower strip shoulder follow the spine of the scapula while the upper strip should be just above it. Both strips should be applied with NO stretch.
- Here is what the finished application looks like:
- For further instructions on how to incorporate kinesiology taping into your self treatment regimen click here.
References
1) Capobianco, Dr. Steven and van den Dries, Greg. (2009). Power Taping, 2nd Edition, Rock Tape Inc, Los Gatos, CA.
2) Hammer, Warren. (2007). Functional Soft-Tissue Examination and Treatment by Manual Methods, 3rd edition. Jones and Bartlett Publishers, Inc, Sudbury, MA.
3) Kase, Kenzo, Wallis, Jim, and Kase, Tsuyoshi. (2003). Clinical Therapeutic Applications of the Kinesio Taping Method.
4) Muscolino, Joseph. (2009). The Muscle and Bone Palpation Manual. Mosby, Inc, St. Louis, MO.

