Shoulder impingement
As you may recall from our intro post on kinesiology taping, we’re going to focus on each muscle group/joint and show you how to use kinesiology tape in three distinct ways:
- Immediately after injury (for swelling and pain)
- During the healing process (correction techniques to restore normal position and allow for healing)
- Techniques to help improve strength + function
In this post, we’ re going to be talking about a taping application designed to restore normal alignment and create space at the front of the shoulder. Impingement syndrome at the front of the shoulder is typically a result of muscle imbalances that allow the humerus (upper arm bone) to slide forward in the joint. Once this happens, the small tendons of the rotator cuff and even the bursa can be pinched when you try to reach overhead. In the case of repetitive motions such as swimming, this can quickly lead to inflammation and pain.
Anatomy
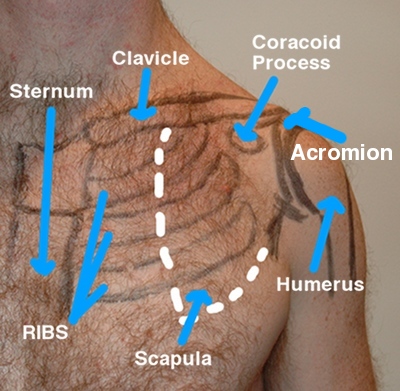
For this taping application, we want to look at the bony structure of the shoulder. Essentially we are trying to pull everything back into into it’s normal position with this tape application. The shoulder is composed of three bones: the scapula, the clavicle, and the humerus. The scapula lays on the back of the rib cage and is held in place by muscle. It connects to the clavicle (aka collar bone) which wraps around from your breast bone/sternum. These two bones meet on the outside of the shoulder at the acromion process (this is the bony bump on the outside of your shoulder). Just beneath the acromion is where the humerus (upper arm bone) attaches to the shoulder blade.
Specifically for this application you will need to be able to find the coracoid process (aka the bony bump that the pec muscles attach to). To find this process, trace your fingers along your clavicle until you feel it curve back just before it gets to the outside of the shoulder. From here drop your fingers down approx 1 inch and press in. Pull your shoulder blades back together and then round your shoulder forward. You will feel a bony bump push forward. This is the coracoid.
You can read more about the anatomy in this area and find palpation tips here.
What you will need:
1) Roll of kinesiology tape.
2) Sharpest scissors in the house.
Prep work:
1) Clean skin. This means no oils or lotions of any kind. You want your skin to be clean and more importantly dry. Moisture of any kind = tape will fall off or fail to stick altogether.
2) Hair care. Ideally, the less hair the better. Guys, this means that for best results you will need to trim any long leg hair or shave the calf area.
3) If clean, dry, and hairless skin still = no sticking of tape. Time to get some adhesive spray like Tuf Skin.
4) The tape should last 3-5 days. You can get it wet and shower with it on. Just towel dry it after. No hair dryer! The tape is heat activated.
Taping Techniques
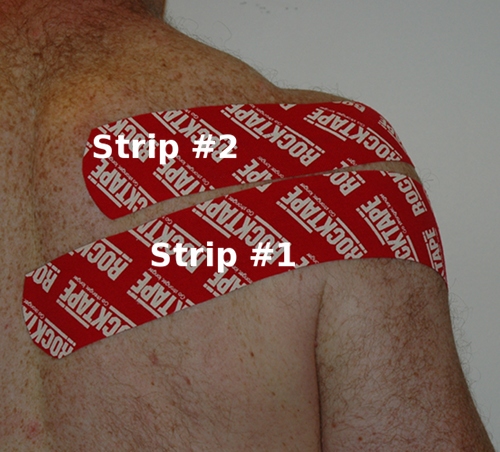
1) Shoulder application (two strips)
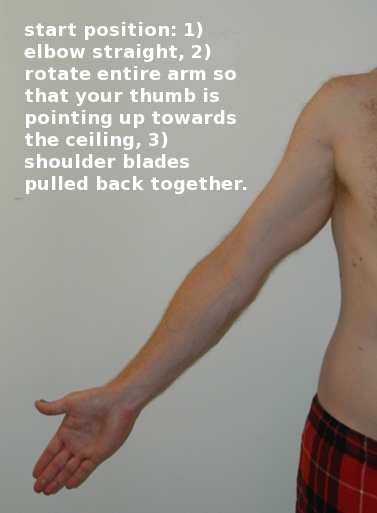
- Prep the skin first. For this application you will want to put the muscles at the front of the shoulder on stretch. To do this, straighten your arm at the elbow and move it out to your side. Then pull your shoulder blades back together and rotate your entire arm so that the thumb is pointing up towards the ceiling like the picture above. Only go as far as you can comfortably!
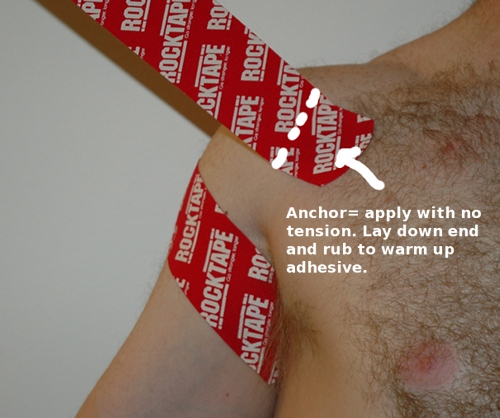
- With the arm in the starting position, apply the anchor first. This means apply the first 1-2 inches of the tape with NO stretch. For this application, you want this tape to be up into the armpit. If you’re a guy. You’ll want to shave!
 You don’t need to wrap the tape under to the back of the arm, just on the front of the that you can see. Apply the anchor and then rub the tape to warm up the adhesive.
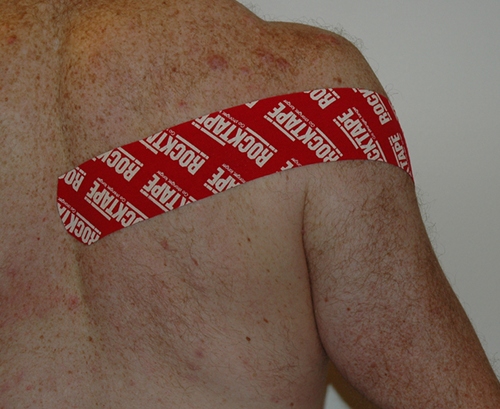
- Once the anchor is in position, wrap the tape around the back of the shoulder all the way to the spine. Remember, the area is already on stretch. Just lay the tape down as you go.
- For the second piece of tape, we want to place the anchor over the front of the shoulder at the coracoid process. Use the palpation tips above!!! Apply the anchor and then rub the tape to warm up the adhesive. Move the arm back to the stretch position.
- Once the anchor is in position, wrap the tape around the back of the shoulder all the way to the spine. Remember, the area is already on stretch. Just lay the tape down as you go. When both strips are applied, the application looks like the picture above.
- When measuring the tape, make sure that the first strip can reach from the armpit all the way to the spine. The second strip should be long enough to cover from the front of the shoulder past the shoulder blade towards the spine.
- For further instructions on how to incorporate kinesiology taping into your self treatment regimen click here.
References
1) Capobianco, Dr. Steven and van den Dries, Greg. (2009). Power Taping, 2nd Edition, Rock Tape Inc, Los Gatos, CA.
2) Hammer, Warren. (2007). Functional Soft-Tissue Examination and Treatment by Manual Methods, 3rd edition. Jones and Bartlett Publishers, Inc, Sudbury, MA.
3) Kase, Kenzo, Wallis, Jim, and Kase, Tsuyoshi. (2003). Clinical Therapeutic Applications of the Kinesio Taping Method.
4) Muscolino, Joseph. (2009). The Muscle and Bone Palpation Manual. Mosby, Inc, St. Louis, MO.

