IT Band Syndrome- Treatment
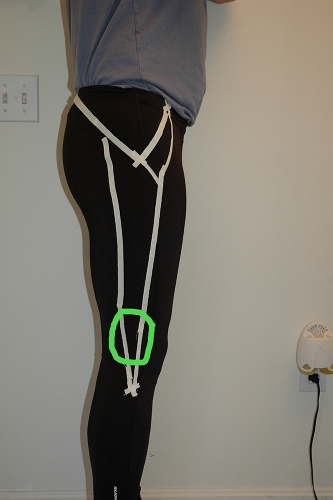
In last week’s post on Iliotibial or IT Band Syndrome (ITBS), we talked about what it actually is from an anatomy standpoint, how it can happen, and how to tell if this is what you have or what else it might be. During this post, we’re going to focus more on the actual treatment for it. This includes guidelines for managing the initial symptoms, how to use Self Muscle Massage to best loosen up the band itself, and specific stretches designed to help improve and maintain this mobility.
Post Injury (or when the symptoms start if there is no “injury”)
Guidelines:
1) Typical symptoms with ITB syndrome include pain or tightness on the outside of the knee at or just above the level of the knee cap and can move all the way up the outside of the leg to the hip. Symptoms are typically worse with activity and better with rest, and swelling can occur at the lower tendon if the inflammation is severe enough. (note: laying on your side with ITB problems can be difficult as the knees are usually pulled in and the band is placed in a stretched position; use pillows between your knees if your a side sleeper).
2) At the time of injury, use R.I.C.E. during the first week. This includes: rest, ice, compression, and elevation. The immediate goal after injury is to decrease the symptoms (pain, swelling, etc) to allow for better mobility.
3) Use self massage to loosen up the gluteus medius (GM) and Tensor Fascia Latae (TFL) muscles; the band originates from both at the hip. In the first 48 hours, focus your efforts around the painful area. If your symptoms are on the lower portion of the band, work the band above them and then include the GM and TFL. If your symptoms are on the middle or upper portion of the band, work below them to where the band inserts on the tibia (lower leg bone). Once you pass the 48 hour mark
4) Use self massage to loosen up some of the potential causes of the injury (over/underpronation at the foot and ankle (post tib, peroneals + calf muscles) and tight adductor/inner hamstring muscles). The primary goal here is to loosen up the structures that are altering the knee position (either pulling it in or out). Start from the ground up!
Self Muscle Massage
Guidelines:
#1) When using self muscle massage on ITBS, keep in mind that you need to two parts: 1) what actually hurts- your ITB, and 2) what is causing the problem. If you only work on what hurts, you will leave the real problem behind to stir up more trouble later.
#2) In the last post on ITB, we identified several restrictions that could lead to an altered knee position in relation to the hip (i.e. either the knee gets pulled in closer to the other knee or gets pulled out away from the other knee). They include:
a. Over or underpronation at the foot and ankle (this means that you will want to work on the muscles along the inner and outer part of the lower leg, namely the posterior tib and peroneals).
b. Tight adductor muscles and inner hamstrings (if these muscles becomes stuck in that shortened position, it will pull the entire thigh in towards the middle of the body).
c. From a mechanical sense, decreased push off (due to restricted ankle, knee, and hip mobility) can also be at fault. A common compensation for decreased push off = using the hamstrings and adductors to help instead of the glutes. If this is the case, it also a good idea to work on the quads and glutes as they tight and overworked.
#3) When working on the ITB itself, start easy and work around the painful area. Work your way closer as the symptoms allow. If there is swelling around the sore area, use R.I.C.E. to reduce it. Wait until all swelling is gone to work directly over the sore area. Start with the foam roller and the lengthening technique. Then move onto the cross friction technique (start with the foam roller and then work on specific areas with the tennis/trigger point ball).
#4) If you are unsure what the cause may be, start from the ground and work your way up. Work the entire lower leg (gastroc/soleus, post tib + peroneals), as well as, the inner thigh (adductors + inner hamstrings).
#5) Ice following soft tissue work, especially on the ITB itself. This will help decrease pain and inflammation. 10-15 minutes is all you need.
Stretching
Guidelines:
1) Stretching should NEVER hurt. The goal is to only go as far as you can comfortably. Once you feel a pull or “stretching sensation” stop there. This way you can build on each stretch without risking injury.
2) You will always get more out of frequency (meaning daily or multiple times per week) instead of one killer session one time per week.
3) Shoot for 20-30 second holds and 3-4 repetitions.
4) Remember: muscles work in pairs. If one group is limited or tight, it will make the other group work harder. Stretch both for best results.
Why these stretches??
In the last post we showed you how ITBS can occur from variations in the position of the knee in relation to the hip (meaning, if the knee is pulled in towards the other knee or pulled out away from the other knee by tight muscles). The stretches detailed below have been chosen specifically to help correct those variations. The primary goal of these stretches is to restore mobility to ankle, knee and hip joints to improve alignment and restore the workload back to the appropriate muscles. This means working from the ground up to make sure the inside and outside of the leg are balanced.
#1 ITB/TFL/Hip Flexor/Quad Combo Stretch
Rationale: This stretch is a great way to loosen up not only your ITB and the TFL (small muscle on the front/side of the hip where the ITB originates from), but also to combine that with your hip flexors and quads which will probably also be tight if you are managing ITB sx.
What you will need: Nothing. Just a solid surface to lay down on. The floor is preferable to your bed as it will maintain good support of the lower back.
Key Points: 1) Break the stretch down into two stretches- the ITB/TFL and the quad/hip flexor, 2) keep your upper back and shoulders relaxed and flat, and 3) shoot for a 20 second hold and repeat 3 times for each.
Where you should feel it: 1) If focusing on the ITB/TFL you should feel it in the front of the hip and down the outside of the thigh, 2) if focusing on the quad/hip flexor, you should feel it in the front of the hip and down the front of your thigh to the knee cap.
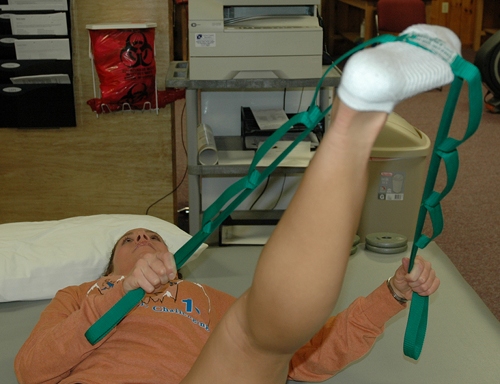
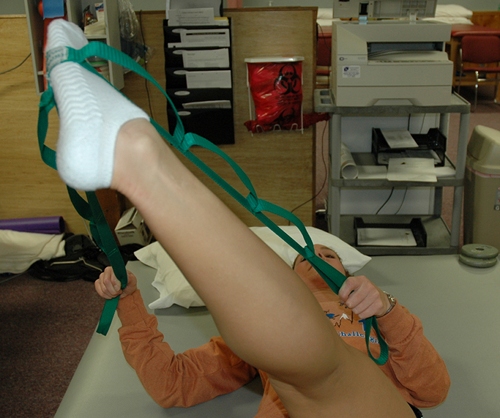
#2 Strap 3 Way (Combo Stretch for lower leg and back of the thigh)
Rationale: This stretch is perfect for starting from the ground up. Each of the three directions starts with the foot and then twists the rest of the leg accordingly. This will you give you a traditional calf + hamstring stretch, an inner calf/post tib + inner hamstring stretch, and an outer calf/peroneal + outer hamstring stretch.
What you will need: a strap, belt, or dogleash. Something long enough to loop around your foot that you can hold onto. Again, this stretch is best performed on a solid surface or the floor.
Key points: 1) this move is three separate stretches (one for each position of the foot- straight up to the ceiling, twisted in and twisted out), 2) only go as far as you can with the knee STRAIGHT (when you feel it start to bend, stop there), 3) as you move the leg in/out from the body, focus on the staying within the width of your shoulders or just outside of it; the focus is on bringing the leg up to get the hamstrings versus the hip, 4) shoot for 20 second holds and repeat 3 times.
 (in this picture, you can see the foot position and how the whole leg is rotated out for this stretch)
 (in this picture you can see how the foot and entire leg are rotated in)
Where you should feel it: 1) for the straight stretch, you should feel it in the middle of your calf, behind your knee and along the back of your thigh; you may even feel it all the way to your butt, 2) with the foot twisted in, you will feel this stretch along the outside of your lower leg and thigh, and 3) with the foot twisted out, you will feel this stretch along the inside of your lower leg and thigh.
#3 Adductor Stretch
Rationale: Remember, to take pressure off the ITB you have to loosen both the band and the muscles that work in the opposite direction- the adductors. Included in this video are a few variations, including to to modify the stretch to work the inner groin/internal rotator muscles.
What you will need: a step stool, stair or low bench (something approx knee height or lower).
Key points: 1) Try to stay in line with your hip! it’s very easy to lean forward/back at the waist to try and get more of a stretch. it may mean less movement, but it will keep the focus on the adductors, 2) keep both knees straight. if this means using a lower step/stool, then so be it. if you feel like you have to bend your other knee, you’ll know the surface is too high, 3) shoot for 20 second holds and repeat 3 times.
Where you should feel it: 1) inner thigh and groin line.


