Toe Deformities + Athletes

In our last blog post we talked about toe deformities and how they can develop from common mobility and range of motion restrictions. What we didn’t talk about was what having bunions, hammer and mallet toes means to an athlete who is training and racing. That’s where this post comes in!

What do you need to worry about?

  • Loss of toe extension (ability to bend your toes back)
  • Progressive loss of ankle mobility (* Remember, those long toe tendons travel up into the calf. The tighter your toes get, the tighter that ankle gets)
  • Less time spent in stance phase (decreased step and stride length)
  • Progressive loss of hip mobility and loss of hip/lumbar relationship (glute shutdown + increased strain on lumbar spine)
  • Progressive compensation upstream in the ankle, knee and hip to work around all of the above

The biggest problem with toe deformities as an athlete is that they reduce the amount of time you are able to spend on that foot. This is time that allows the big muscle groups to share the workload from muscle to muscle, moving you forward in an efficient manner. This time is also important because it allows the transition from shock absorption to stability and propulsion to occur. When you decrease the time on your feet, you are preventing that stabilization from happening. Now, instead of a strong platform to push off of, you get stuck somewhere in between or with no push off at all. This progression also means that the workload never quite reaches the hips as you aren’t on your feet long enough to get there.

With that in mind, let’s talk about which muscle groups get beat up trying to work this way:

  1. The inner calf and peroneals. When there are toe and ankle mobility losses, rotation occurs to keep you from falling over your own feet. This rotation means that instead of using the larger shin and calf muscles, you start to rely more on the smaller peroneals and posterior tib/long toe flexors. These muscle groups are smaller and are not designed to be used for long periods of time. They will require more frequent self care to ensure that they are recovering. Likewise, the calf (gastroc/soleus) and shin will tighten over time because they are not be used like they are supposed to be.
  2. Inner hamstrings/adductors. As your push off is decreased and the hip becomes less active, the quads become the dominant power muscle. This will continue until they become too fatigued to handle the workload. This is when it is common for propulsion to occur through internal rotation of the femur. This allows the inner hamstrings and adductors to pull you forward. The rotation also strains the external hip rotators (piriformis) and smaller glute muscles as they try to stabilize and that excessive rotation. This sometimes can lead to strains and tendonitis developing along the outer quad and IT band as the thigh rotates one way and the lower leg the other way.

So what does all of that actually mean to you as an athlete?

Toe deformities do not mean a life on the sidelines. What they do mean is a reality check- you will have a much smaller margin for error when it comes to self care and recovery versus someone with normal mobility, mechanics, and strength. The good news is that there is a lot you can do to ensure you are recovering between workouts. The better news? You can use the same tools as every one else (foam roller, massage balls, the occasional deep tissue massage, etc). The only change that happens is what muscle groups you are focusing on.

Here is an easy visual:

In an athlete with good mobility and mechanics, the muscles directly along the front and back of the leg take the brunt of the wear and tear. These are the big, power muscles in the legs (gastroc, quads, hamstrings, glutes). While these muscle groups will be affected by compensation for the toe deformity, they will no longer be your primary source of movement. For someone with a toe deformity, we know that your mechanics will be altered. We also know that you will be compensating around the restrictions that led to your toe deformity. For you, the muscles along the inside and outside of the leg will be doing most of the heavy lifting. Since they are not designed for this, they have a much bigger chance of getting cranky and breaking down.

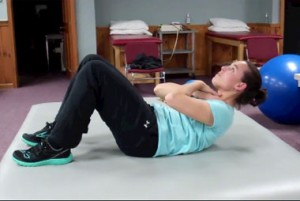
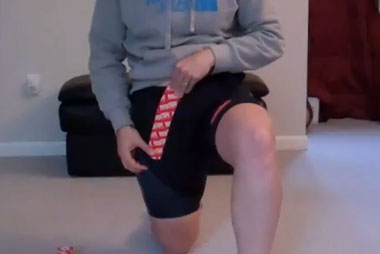
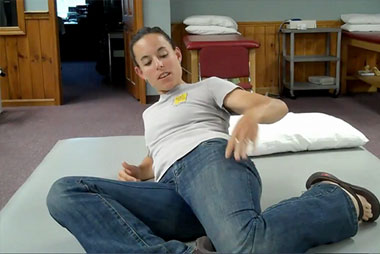
The advice is simple. Make the time to keep an eye on these areas and stay ahead of things instead of waiting for symptoms! Here is a little sample routine to get you started. It will take 15 minutes per foot! Start with the massage and follow with the stretches.

Massage:

Stretching:

Next steps or looking for more?

You have two options. Free users can use the Basics Courses located on the body map. Refer back to our last post for more information on which areas you need. For premium users, head to the Toe Deformities course for a progression of these techniques.

Let’s Talk Toes

When it comes to bunions, hammer, and mallet toes, the most common questions that I get most from athletes are how can I keep training and is surgery really my only option? Both of these are completely understandable questions, especially when you look at the typical article written about toe deformities. They offer a list of potential causes and then talk about surgical options for when “symptoms become unbearable”. Some will talk about toe spacers, pads, and taping, but most solutions are geared at symptom relief versus a long term solution. The good news? This article isn’t one of those. Instead of focusing on a list of causes, we are going to talk about toe deformities and what the different types all have in common from a biomechanics stand point.

Types of Toe Deformities


In normal anatomy, all toes are made up of little bones called phalanges. Every toe except the big toe has three of them (the big toe only has two). These phalanges create three joints called interphalangeal joints or more simply IP joints. The furthest is called the DIP (distal IP joint) and the middle is called the PIP (proximal IP joint). The closest phalange then connects to the metatarsal (long bone of the foot) at the MTP joint. Think of this one like the knuckle in the hand. Why is all of this anatomy important? Toe deformities occur when these three joints (MTP, PIP, DIP) get stuck in a position, creating inflammation and permanent changes to the bone.

Bunions - these can occur on either side of the foot although the big toe is the most common. A bunion occurs when the MTP moves away from the second toe. Over time this forces the phalanges in towards the other toes.

Hammer Toe - these are most common in the second toe (directly next to the big toe) but can happen in any of the smaller toes. This deformity occurs when the PIP joint gets stucked in a bent position. Over time this can grow to include extension at both the MTP and DIP joints.

Mallet Toe- like hammer toes, these can affect any of the smaller toes. The deformity occurs when the DIP gets stuck in a bent/flexed position.

Hallux Limitus/Rigidus (not pictured above) - this deformity affects only the big toe. The MTP joint becomes increasingly limited in motion. In the early stages this is known as hallus limitus. If this loss of motion continues, bone spurs can grow as the result of prolonged inflammation and will make the motion loss rigid as it is now blocked by bone on bone contact.

How Do They Happen?

The most important thing to realize about these types of injuries is that they all result from a progression of changes. You don’t just wake up one day with a bunion or hammer toe. These types of injuries start with a simple loss in mobility that over time results in joint breakdown and permanent bone change. Here’s a visual:

Loss of Motion > Contracture (muscle/tendon/ligaments get stuck short) > Breakdown of cartilage/bone > Bone spur/bunion formation

When you think about the different types of toe deformities in this regard, they become more like an overuse injury. Improper shoes, genetics, and prior injuries can all contribute to this type of injury by creating or exacerbating an underlying mechanical problem. This could be mobility loss in the foot, ankle or hip, decreased strength, or even coordination/muscle imbalances. Whatever the original restriction, the damage to the toes is the result of the body compensating and ultimately working in a way it isn’t designed to. Eventually, it will result in something breaking down under the strain produced by that compensation. In the case of toe deformities, the joints of the toes are what eventually breakdown.

So what can you do about it now?

While the actual changes to the bone and joint are irreversible without surgical correction, it’s important to realize that you still have a lot of control over your feet and the underlying mechanical causes. By improving mobility to the foot and ankle, you can normalize how you walk and run and take pressure off of the toes. This will allow the recurrent inflammation to calm down and help prevent further degenerative changes from happening.

In the video below, we are going to talk about some of the contributing mechanical factors at play and go through a little self test to see how your mobility stacks up:

In the self test at the end, we went through four movements. Here’s a breakdown of the test + next steps:

Self Test Walk through Result How To Fix
Toe Flexion
  1. start seated
  2. keep ankle in neutral position
  3. bend one toe at a time, joint by joint
  4. stop when you feel a pull
Ideally, you want to be able to flex (bend)your toe completely at all three joints.

If you can’t do this, the next test will help determine if the restrictions are above the ankle or below it.

  • If your toe mobility was normal? Nothing to fix!
  • If your toe was limited with just this movement? Start with the foot basics course. If you have a premium account and are looking for more, the toe deformity course will streamline this for you.
Toe Flexion with Ankle Plantarflexed
  1. start seated
  2. point ankle down (plantarflex it)
  3. bend one toe at a time, joint by joint
  4. stop when you feel a pull
How did your toe mobility change? Did it stay the same or did it get worse?

If it got worse, that likely means that you have restrictions both in the foot and up along the shin as well.

  • If your mobility was unchanged and looked normal? Perfect!
  • If your mobility got worse with this test, you will want to add in work on the shin itself where the long toe extensors are located.
  • For free users, check out the foot basics course in addition to the shin basics course. For premium users, the toe deformity course will streamline this for you.
Toe Extension
  1. start seated
  2. keep ankle in neutral
  3. pull one toe back, one joint at a time
  4. stop when you feel a pull
Ideally, you want to be able to extend (bend back) your toe completely at all three joints.

If you can’t do this, the next test will help determine if the restrictions are above the ankle or below it.

  • If your toe mobility was normal? Nothing to fix!
  • If your toe was limited with just this movement? Start with the foot basics course. If you have a premium account and are looking for more, the toe deformity course is the one for you.
Toe Extension with Ankle Dorsiflexed
  1. start seated
  2. pull ankle up (dorsiflex it)
  3. pull one toe back at a time, one joint at a time
  4. stop when you feel a pull
How did your ankle mobility change? Did it get worse with the knee straight or did it stay the same?

If it got worse, that likely means that you have restrictions deeper in the calf where the long toe flexors are located.

  • If your mobility was unchanged and looked normal? Awesome!
  • If your mobility got worse with this test, you will want to add in work on the calf where the long toe flexors.
  • For free users, check out the calf basics course in addition to the foot basics course from above. For premium users, the toe deformity course will streamline this for you.


Stay tuned: next week we will dive into what toe deformities mean to you as an athlete in terms of shoe selection, problem areas and recovery!

Ankle Range of Motion

When it comes to overuse injuries it is really easy to see them as an isolated event. The problem, however, is that overuse injuries are not an isolated thing. In fact, overuse injuries are the result of a mechanical problem. This could be mobility loss, decreased strength, or even coordination/muscle imbalance. Whatever the restriction, the injuries that happen are a result of the body compensating and ultimately working in a way it isn’t designed to. Eventually, it will result in something breaking down under the strain produced by that compensation.

The reason I bring all of this up is to point out that a single mechanical problem can actually manifest in a number of ways. Let’s take a look at ankle dorsiflexion for example:

Ankle dorsiflexion is your ability to bring the shin/tibia over the foot. Walking around normally doesn’t doesn’t require that much, but when moving at effort, the demands increase as you load the foot and ankle in prep for more propulsion. Restrictions here will limit that load period and in some cases stop your ability to push off of the foot completely. This means your body has to find a new way to move forward or you will fall over your own two feet. Depending on how your body tries to compensate, a number of injuries are possible.

That is why I wanted to do a blog series about normal mechanics and mobility. There is a reason certain treatments are seen across multiple injuries. It’s because even though what broke is different, the mechanical problems that led to it are likely the same.

With that in mind let’s get started. Up First? The Ankle Joint

In a lot of ways the ankle is the gateway to normal walking, running, etc. Our foot is the first thing to hit the ground and the mobility our ankle provides is what allows us to move over and push off of that foot. Without it, compensation is required to keep you from falling over your own foot. Let’s take a closer look! (note: the last minute is a self test. pause as you need to!)


In the self test at the end, we went through three movements. Here’s a breakdown of the test + next steps:

Self Test Walk through Result How To Fix
Dorsiflexion
  1. start in half kneeling position
  2. keep heel perfectly flat on floor
  3. lunge forward so that your knee comes over your toes.
  4. stop when you feel your heel start to come up
Ideally, you want to be able to keep you heel down and move your knee comfortably over the toes.

If you can’t do this, the next two tests will help determine if the restrictions are above the ankle or below it.

  • If your ankle mobility was normal? Nothing to fix!
  • If your ankle was limited with just this movement? Start with the calf basics course.
  • If your ankle was limited in all movements? You will need to address multiple areas. Combine the calf, knee and foot basics courses. If you have a premium account, the chronic tight calves course will streamline this for you.
Dorsiflexion with toes on stretch
  1. place something under the toes. in the video I am using a massage stick. 1-2 inches of height is plenty.
  2. relax the foot and repeat the first test.
How did your ankle mobility change? Did it stay the same or did it get worse?

If it got worse, that likely means that you have restrictions in the foot itself. This can be the small muscles within the foot, the long tendons coming from the deep calf, or a combination of both.

  • If your mobility was unchanged and looked normal? Perfect!
  • If your mobility got worse with this test, you will want to add in work on the foot itself. For free users, check out the foot basics course in addition to the calf basics course from above. For premium users, the chronic tight calves course will streamline this for you.
Dorsiflexion with knee on stretch
  1. keep your heel perfectly flat
  2. straighten the knee so that it is locked straight and repeat the first test
How did your ankle mobility change? Did it get worse with the knee straight or did it stay the same?

If it got worse, that likely means that you have restrictions behind the knee where the gastroc and hamstring tendons criss cross each other.

  • If your mobility was unchanged and looked normal? Awesome!
  • If your mobility got worse with this test, you will want to add in work on the back of the knee. For free users, check out the hamstring basics course in addition to the calf basics course from above. For premium users, the chronic tight calves course will streamline this for you.


How To Loosen Up Stubborn Areas

question mark on a sticky note against grained wood

Today we kick off our weekly Q&A session with the most common question I get:

“I have been working on _______ EVERY day and it will not loosen up. What do I do?”

We have all been there on this one. For some of you it may be the calves or hamstrings, and for others maybe it’s a hip or a persistent shoulder issue that just won’t let up. Whatever the area, the problem just won’t go away despite consistent work with the roller or massage ball. So what’s going on and why won’t it go away??

The first thing to realize is that our bodies are not like cars. If something breaks down, we can’t just swap that part out and carry on our merry way like it never happened. This is even more true when it comes to overuse injuries. For most of us, the start of symptoms and the start of the injury are not one and the same. There is a gap between the two and that gap is where we learn how to compensate around the problem so that we can continue training , racing, competing, etc.

This means we need to step back and stop focusing our efforts just on the area that hurts. Instead, we need to think about what other areas are contributing to the problem. Here’s an example:

Shoulder Pain (front of the shoulder to be more specific):

  • You start your self treatment using the Anterior (Front of) Shoulder Basics Course. This will take you through a progression of treatments targeting that area over the course of a few days. You want that time to see what works and to allow recovery between treatment sessions. However, at the end of that program, your shoulder still hurts. Now what?
  • My next step would be to include work on the opposite side of the shoulder. Why? Muscle groups work in pairs. These pairs allow controlled movement of a joint in opposite directions.  If the front side is having problems, then its safe to assume that the back side is as well. Head over to the body map and pull up the back of the shoulder. Add those techniques into your self treatment and reassess how things are feeling.
  • If working both sides doesn’t help, then it’s time to expand the areas we are working on. Why? Most major muscle groups work to move more than one joint. If there are problems at one joint, that muscle group will likely be compromised in how it moves the other joint. This is why the next step is to move up one joint and move down one joint. Using the shoulder as an example, this means that it is time to see how the neck and upper arm (biceps/triceps) are feeling. Back to the body map and pull up those basics courses to learn those techniques.

To put it more simply:

  1. Start with the problem area.
  2. Expand the area you are working on to include the opposite side as well.
  3. Add in the areas directly above and below the problem area.

Sound complicated? It’s not at all! This is where the interactive body map comes in. It doesn’t require you to know muscle groups or names. Simply start with your problem area and then flip the map over to find the area on the other side (this option is on the left hand side of the map). If you are moving up or below, use your mouse to select the areas directly above and directly below.

ATA Turns 6 (and gets a big makeover!)

iStock_000002119649_Small

It’s hard to believe that this past January the ATA website turned six years old! For those of you who have been along for the ride from the beginning, you have seen a few different versions of the site now. What started as a little clinic wordpress blog has grown into a virtual warehouse of pictures, videos and content. In fact, managing all of that content and keeping it organized, user friendly, and time efficient has been my biggest challenge so far! Thankfully, you have all been a wonderful feedback loop over the years.
That’s why when I sat down to plan out the next phase for ATA, it was with your suggestions and feedback in mind.
  • Problem #1: Site Navigation. Let’s be honest, there is A LOT of information on the site. The body map was a great start in terms of organizing all of it by region, but it still made for large amounts of clicking around to find stuff. Despite my attempts to organize and reorganize, I never really could find a good fix for this until now. The new site is truly an educational site, complete with “courses”. These courses allow me to not only deliver the content in a streamlined way, they allow me to keep everything all in one place, on one screen. The new site is essentially an “app”. It’s simple and incredibly easy to use.
  • Problem #2: Information Overload. The new course setup allows me to keep things short and to the point. Even the videos have a whole new look. There are little timers built in and directions so that you can literally watch and let the video do the rest. Each treatment will take you less than 10 minutes from start to finish.
  • Problem #3: Not mobile device friendly. The new site is more mobile friendly than it is desktop friendly. Why? Because I want you to be able to pull this stuff up on your phone or tablet while you’re on your family room floor using the treatment techniques.


Here’s a video to show you how it all works:

So what does all of that mean for you as the user??

To access the courses, you will need to create an account and sign up for a membership plan. 🙂

Here’s what you can expect with your membership:

  • Access to all of the courses. As of today, there are 18 courses currently on the site. This number is only going to grow over the next few weeks as I start loading up the injury specific courses. Once those are done, you can expect 1-2 courses per month on average. My plan is to have three types of courses per region:
    • Basic- these courses are region specific and focus on how to use the different self treatment techniques on that area only.
    • Intermediate- these courses are more in depth and take a more total body approach by working on areas above and below the symptom area.
    • Advanced - these are injury specific courses. Like the intermediate courses, these are more in depth and designed to not only cure your symptoms, but also help you identify the cause behind them.
  • Access to monthly webinars and Q&A’s. These will be announced on the blog and also through member emails. Each will be recorded so if you miss one? No problem. You will be able to download it when you have the time.
  • Access to me for questions, feed back etc. As things get rolling I will be posting “office hours” for you to reach me on skype.

In addition to individual plans, the new site layout also gives me the ability to create custom courses for teams and groups. Coaches? Need an offseason maintenance plan for your athletes or a post workout recovery routine? This is the option for you. Simply use the contact page to tell me what you are looking for!

Sounds pretty good doesn’t it?


Strengthening

What:

Muscles and joints that have been stuck in a tight/short position lose the ability to function normally over time. This is a fact. Remember, the body is phenomenal at being able to adapt when something breaks down. It will find a way to keep moving forward even if it has to call in every muscle it can to compensate. This is why need to restore strength and balance to the entire functional chain.

How:

The ATA system uses a total body strengthening approach that works from the proximal joints out. This means that we want to create stability where it is required and power/strength that can use that stability. In other words, we want to restore balance to the entire functional chain so that each muscle is working to its potential, when it should be working. We also want it to be resting when it should be resting.

What You Need To Get Started:

Equipment will vary based on the area you are working on. Examples include: hand/ankle weights, resistance band/tubing, and a stability ball. Wherever possible options will be given for both home and gym routines.

strengthrn

Kinesiology Tape

What:

Kinesiology tape is a specially made elastic tape that can be applied to your muscles or joints to decrease pain and swelling, correct faulty motion, and assist weak or injured muscles. It can also be used as a proprioceptive tool for muscle re-education for sport specific movements such as running, cycling, and swimming. In short, these $20 rolls of tape are a must have addition to your training bag and can be used in several different ways throughout the healing cycle.

How:

The ATA system uses the tape in four different ways:

  • For symptom control to decrease pain and swelling.
  • To restore normal muscle position and joint alignment (blocking faulty motion as needed; providing negative feedback to inhibit faulty motion).
  • To assist weak and injured muscles to promote recovery.
  • As a proprioceptive tool to re-educate muscles to improve form and athletic performance through sport specific movement patterns.

What Do You Need To Get Started:

A roll of tape and the sharpest scissors you can find. Seriously. Cheap scissors will fray the tape and cause it to roll up.

tape

Stretching

What:

In the ATA System, we use self massage and mobilizations to break up restrictions and restore mobility. The next step is to stretch those muscle fibers and joints out so that the body can register that a change has occurred and adapt accordingly. You see muscles have what is known as a resting length and tension. This means that at rest, a muscle has an ideal length and tension that allow it to function at full capacity in terms of the force it can generate and the velocity at which it can move the joint it supports. Changes to that resting length and tension, whether it’s loss of mobility or increased tension in the form of knots, spasms, etc, will limit the muscles performance. The bigger the change, the more significant the loss of function. Stretching is a great way to help the muscle reset and restore how the brain and nervous system utilize that muscle.

How:

The key to success with stretching is frequency, frequency, frequency. In sports, we literally perform the same actions millions of times whether its steps, pedal rpms, or swim strokes. It’s going to take more than a few massage sessions to get things back to normal on the mobility front.

What you need to get started:

In most cases, nothing at all. Nice to haves include a long strap or belt that you can hold onto.

stretching

Peroneal/shin mobilizations

In this post I’m going to show you how to use the tennis ball to mobilize the muscles along the shin bone and down the outside of the lower leg . This includes the anterior tibialis, extensor digitorum, and peroneal muscles. The goal with this mobilization is to anchor one end of the muscle down and then actively stretch out the rest of the muscle against it.

Key Points

1) Go back and read the massage post specifically on the hand itself to review the body landmarks and muscles in this region. There is one bony landmark that you will need to be able to find to as your point of reference- the fibular head. This is where the peroneal muscles attach and if you move forward towards the shin from this landmark, where the anterior tib and EDL muscles are.

The fibular head is actually located slightly below the knee. To find it, while sitting with your knee bent, wrap your hand around the upper part of your calf so that the space between your thumb and index finger are directly behind the knee and your fingers are wrapped around towards the front of your knee. The fibular head will be the large, bony bump under your index finger.

2) To perform these mobilizations, you’re going to need a tennis ball and some floor space. The basic idea is to apply pressure with the tennis ball to one of the three yellow x’s (picture below) and to then move the foot/ankle to stretch out the muscle against it. Remember, only go as far as you can comfortably. You’re not trying to force these! If this is too much or the spot is too tender ease up on the pressure or go back to the foam roller. See the video below for full details and demonstration of the mobilizations.

3) Repeat for 10 reps.

4) Same warm up rules apply. Try to do this either following a workout or warm up the area with the foam roller first. Especially if you’re coming back from an injury or this is a problem area.

Video

Lower Back

This region is home to the large muscles of the low back including the paraspinals (erector spinae and multifidus), as well as, the quadratus lumborum and larger overlapping latissimus dorsi muscles. In this section you will find our available treatment plans as well as the different self treatment techniques on this site.

Injury Treatment Plans for this area:

(* note. each treatment plan includes a free downloadable PDF. Here’s a post on how to use them.)

1) Low back strain. Click here.

These plans are part of our “Injury of the Week” blog series. Each post will talk about what the injury is and how it can happen. It will then take you through all five steps of the ATA self treatment system including self massage, mobilizations, kinesiology taping, stretching and strengthening.

Individual Parts of Self Treatment System:

Part 1. Self Muscle Massage.

  1. Blog post with anatomy review, video and picture demonstration of self muscle release techniques for the low back using a foam roller and tennis ball. Click here.
  2. Blog post on additional treatment tools for use in the back, including the RAD Roller, Rumble Roller, and Knobber. Click here.

Part 2. Mobilizations

  1. Blog post on how to perform a tennis ball mobilization/active release of the low back. click here.

Part 3. Stretching.

  1. Blog post on how to stretch out the muscles of the low back. Click here.

Part 4. Kinesiology tape.

  1. Blog post on how to apply tape following a low back strain/sprain. Click here.

Part 5. Strengthening. 

Right now our strength advice is specific to our “injury of the week” blog series (see top of this page for injuries affecting this area). However, all of our strenghtening videos can be found on our youtube channel (link at top of website).